

Other than buying tomato seeds or seedlings for your garden, there is a more economical and money-saving technique, which is to be harvesting tomato seeds from the bounty of your tomato fruits.
It is not complicated to save your own tomato seeds. If you have fully ripe, disease-free tomatoes, then you have the perfect setup to start your own seed collecting.
Table of Contents
Why Should You Save Tomato Seeds?
It saves you money
If you collect the seeds from your favorite tomato variety, you can grow them again next season.
It makes you self-sufficient. You can grow tomatoes independently year after year without buying seeds or seedlings from a vendor, plus you know how the seeds performed and were cultivated.
You can exchange seeds
After saving your own tomato seeds, it’s possible to use the seeds to trade with other gardeners. If you have extras, you can also share them with other family members and friends and help them to get their tomato planting started.
Allows you to grow lots of crops
If you have your own seeds, you can grow as many tomatoes as you like.
When you use the seeds from your best tomato plants you are ensuring that next year’s crop will look the same as this season.
Harvesting seeds and saving them for the next growing season is easy as long as you know how. It does require waiting time and a few steps, but it’s not difficult. Let’s take a look:
Choose The Seeds
Before you start saving tomato seeds for next year, you should consider which plants to use to cultivate your seeds for the next season.
When choosing seeds, make sure you choose seeds from a tomato plant that are open pollinated varieties. The plants that have been open-pollinated will produce seeds that remain true to type to their parent plant vs seeds from hybrid plants were produced by companies that have combined varieties to make a new one and may not breed properly for you from seed.
If you don’t have any open-pollinated tomatoes open-pollinated tomatoes in your garden, you can use those from heirloom tomatoes you can get at the local farmer’s market.
Collecting Tomato Seeds Preparation
To prepare the seeds for saving you’ll need to take them through a process of fermentation, in order to do this, make sure you have the following:
Glass jar or bowl
Envelopes or paper bags for storage
Cheesecloth, paper towel, or plastic wrap
Paper plate
Strainer
Label
Fermenting Tomato Seeds
The fermenting process is easy:
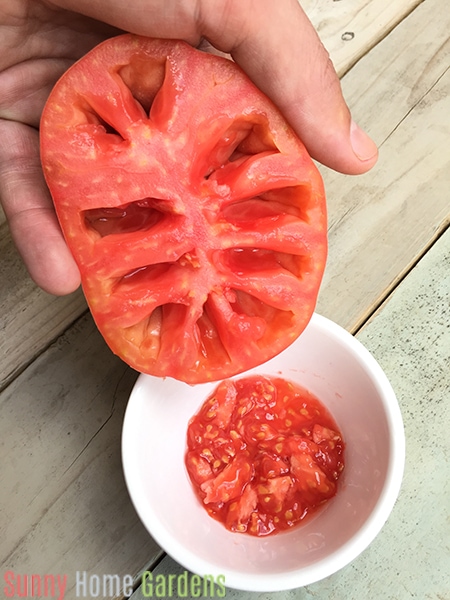
1. Wash all the dirt and dust off of the tomato before slicing to keep any disease or fungus from being transferred inside the tomato. Using a knife, slice the ripe tomato in half.
2. Scoop out the insides, including the seeds and the gel surrounding the seeds, with a spoon. The gel sac that surrounds the seed keeps it from germinating, so this process will allow the seeds to germinate.
3. Place the contents in a clean cup or container.
4. Add water to the container. The amount of water should be enough to cover the seeds.
5. Cover the container with cheesecloth, a paper towel, or plastic wrap. Before securing, you should ensure that there is enough room for air circulation around the seeds. If you are using plastic wrap, make sure to poke a few holes in the top.
6. Place the container in a warm location, but away from direct sunlight.
7. At least once a day, remove the cover from the container and stir the seed mixture.
8. Allow the seeds to sit for several days until you see a film form on top of the water and the seeds start to sink to the bottom. The viable seeds are those that sink to the bottom, in most varieties. You know that the seeds are fermented if:
- The seeds start to separate and they sink to the bottom of the container.
- There’s a white, foamy mold that has formed on top of the water.
- Bubbles have started to form at the top of the container.
9. Using a spoon, remove the moldy film as well as any seeds that float on top of the water, as they aren’t viable, then you’ll want to discard all of that.
10. Clean the container well and fill it again with fresh, room temperature water.
11. Wash the seeds by swishing them gently around in the clean water.
12. Put a cover on top of the container (you can use cheesecloth) and pour off the water.
13. Place the seeds in a strainer and then rinse them under running room temperature water.
14. Spread the seeds out on a paper plate, coffee filter, wax paper, or paper towels (warning – the tomato seeds can stick to the paper towels as they dry and be hard to take off). If you’re saving different varieties, label each plate with the seed variety.
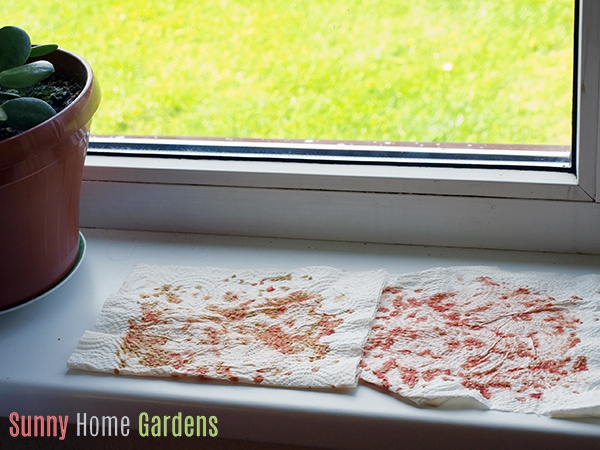
15. Allow the seeds to dry out in direct sunlight completely. Shake or stir them periodically. The drying time may take up to 1 to 2 weeks.
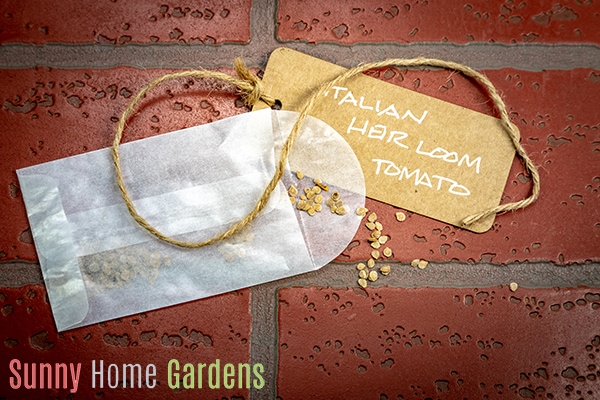
16. Once the seeds are completely dry, place them in an envelope or paper bag. Don’t forget to label them with the name of the seed variety and the date they were stored.
17. Place the container in a cool, dark place like your pantry or at the back of your fridge, don’t freeze them. They need to remain in a cool, dry area. If they are subjected to humidity or moisture it can cause them to rot.
How Will You Know If The Seeds Are Completely Dry?
1. Allow the seeds to dry out for at least one to three weeks.
2. The seeds start to be very hard.
3. They are difficult to smash or to bite.
4. The seeds make a faint snapping noise when you try and break them.
Things To Keep In Mind When Saving Tomato Seeds
Never use plastic or ceramic plates when drying your tomato seeds. When drying, any water needs to be wicked away from the seeds to allow for proper drying out. Plastic or ceramic plates can retain water and inhibit the process.
Proper storing and drying of the seeds means that they can be kept and will remain viable for up to 6 years.
You can store the dry seeds in an envelope or paper bag. Just be sure to label and date them and keep them sealed well.
If you store the seeds in the refrigerator, allow the container to reach room temperature before opening it to use for planting. Opening the container before allowing it to reach room temperature will introduce moisture to the seeds which can cause them to rot and fail or harbor fungus or disease.
Be careful when storing the seeds in a plastic packet. If some seeds still contain moisture, it will transfer to all the seeds in the packet. The moisture will encourage mildew and will cause the seeds to rot.
Do not try to speed up the process of drying out the seeds by using heat. Heat can destroy the seeds.
During the drying process, shake the plate or stir the seeds to avoid clumping and allowing equal and even drying. Spread the seeds in a single layer. Once the seeds are exposed to air, they can dry out faster.
Saving your tomato seeds will guarantee that you can grow the best (or your favorite) variety. It also saves you money.
Being able to save your own seeds and grow crops from them year after year is very satisfying and allows you to be self-sufficient.
Good luck with saving your tomato seeds!


Very helpful information!! Thank you