Learn how to propagate rosemary from cuttings in this step-by-step guide. Learn both soil and water propagation as well as layering rosemary in order to make new rosemary plants.
Propagating rosemary is a rewarding and cost-effective way to expand your herb garden.
This perennial herb is not only a staple in the kitchen but also boasts various health benefits. By learning how to propagate rosemary, you can not only enjoy its fragrance and flavor year-round but also share healthy plant cuttings with friends and family.
There are two main methods for propagating rosemary: rooting cuttings in water or from cuttings in soil.
Whichever method you choose, patience and attention to detail are crucial to ensure successful root development. We’ll guide you step-by-step through both methods and give you some useful tips on how to nurture your new rosemary plants for a more vibrant and thriving garden.
With the right techniques and care, you’ll soon have new, healthy rosemary plants ready to flourish. Let’s dive in and learn how to propagate this wonderful herb.
Table of Contents
How to Propagate Rosemary from Cuttings
Propagating rosemary involves taking cuttings from younger, non-flowering shoots and rooting them in water before transferring them to soil for further growth. Make sure you aren’t taking cuttings from the woody part, because it won’t work as well.
This method is considered the fastest and easiest way to grow an unlimited supply of rosemary plants.
Take Rosemary Cutting
To successfully propagate rosemary, it’s important to choose the right cuttings.
The best time to take cuttings is during late spring or early summer when the rosemary plant has new growth at its tips.
First and foremost, make sure that the mother plant is healthy and well-established.
This will increase your chances of getting strong, healthy cuttings that will grow effectively.
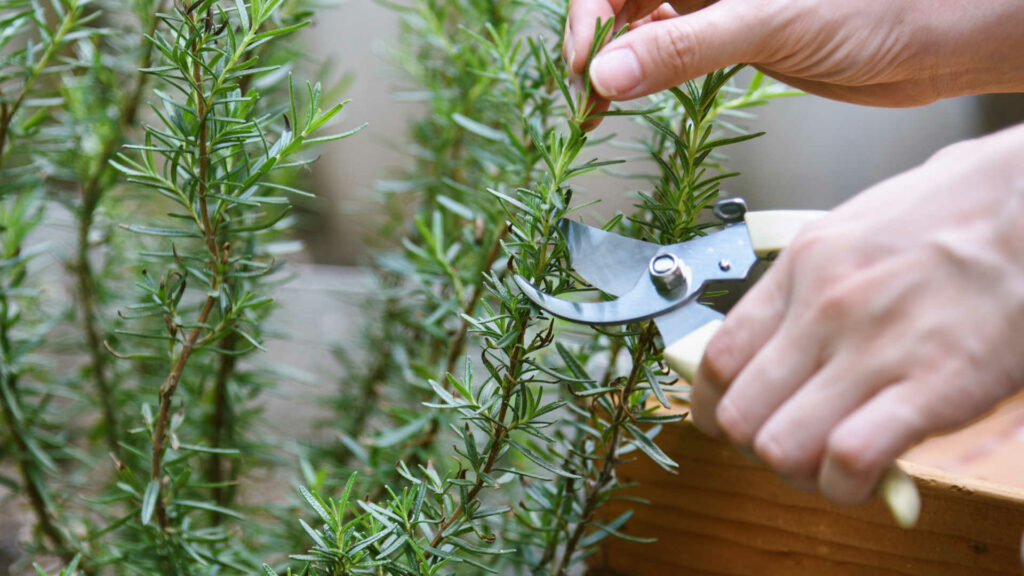
The ideal cutting size should be around 4-6 inches in length. Make sure to look for stems that are not too thick or too thin.
When selecting the stem, pay attention to its appearance. A suitable stem should have young, fresh, and green tips that has grown in the current year.
Avoid using older, woody stems as they might not root well. Once you’ve identified a suitable stem, use a clean, sharp knife or a pair of pruners or scissors to cut the stem just below a leaf node, about 4-6 inches below the tip.
The node is the point on the stem where a leaf or new growth emerges, and it’s important to cut just below this point, as this part of the stem has a higher concentration of growth hormones, which will aid in root development.
With the cutting prepared, double-check that your knife or pruning shears are clean. Dirty tools can transfer diseases to your cutting, so make sure that they’re thoroughly cleaned before and after each use. Additionally, using a sharp tool will minimize damage to the parent plant and promote healthy regrowth.
Preparing the Cutting
After obtaining your cutting from an existing plant, it’s important to clean it up. Remove the lower leaves from the bottom 2 inches of the stem, leaving only the top few leaves. By removing these lower leaves, you’re allowing the cutting to focus its energy on developing roots instead of supporting leaves.
Rooting the Cutting
There are two different ways you can root your cuttings – either through soil propagation or water propagation. Both methods are the same for taking the cutting.
Soil Propagation
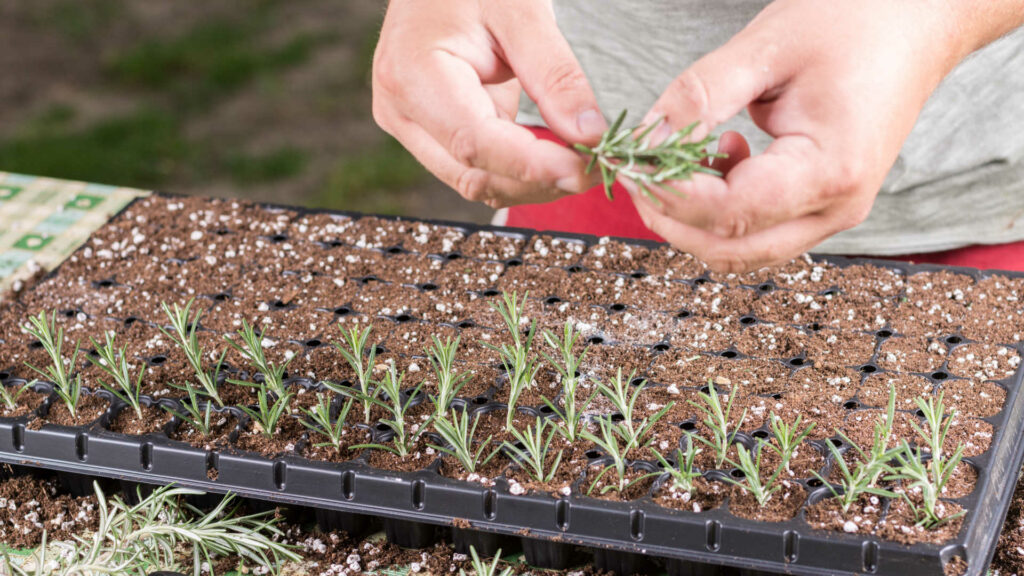
You don’t have to use rooting hormone to successfully soil propagate rosemary, but I have included those in the directions below. You might have better or quicker success by using the rooting hormone, but there are plenty of times where rosemary cuttings will root without the rooting hormone.
- Dip the cut end in rooting hormone to promote root development (optional).
- Fill a pot or container with a well-draining propagation medium such as perlite mixed with peat moss, and insert the cutting into the mix. If you use soil, then make sure the soil is moistened prior to putting the cutting in it.
- Cover the pot with a plastic bag or dome to maintain humidity.
- Place the cutting in a warm spot with indirect light and monitor the temperature to keep it stable between 65-75°F.
- Keep the soil moist by watering gently when needed.
- After 4-6 weeks, the cutting should develop roots and can be transplanted into the garden or a larger pot.
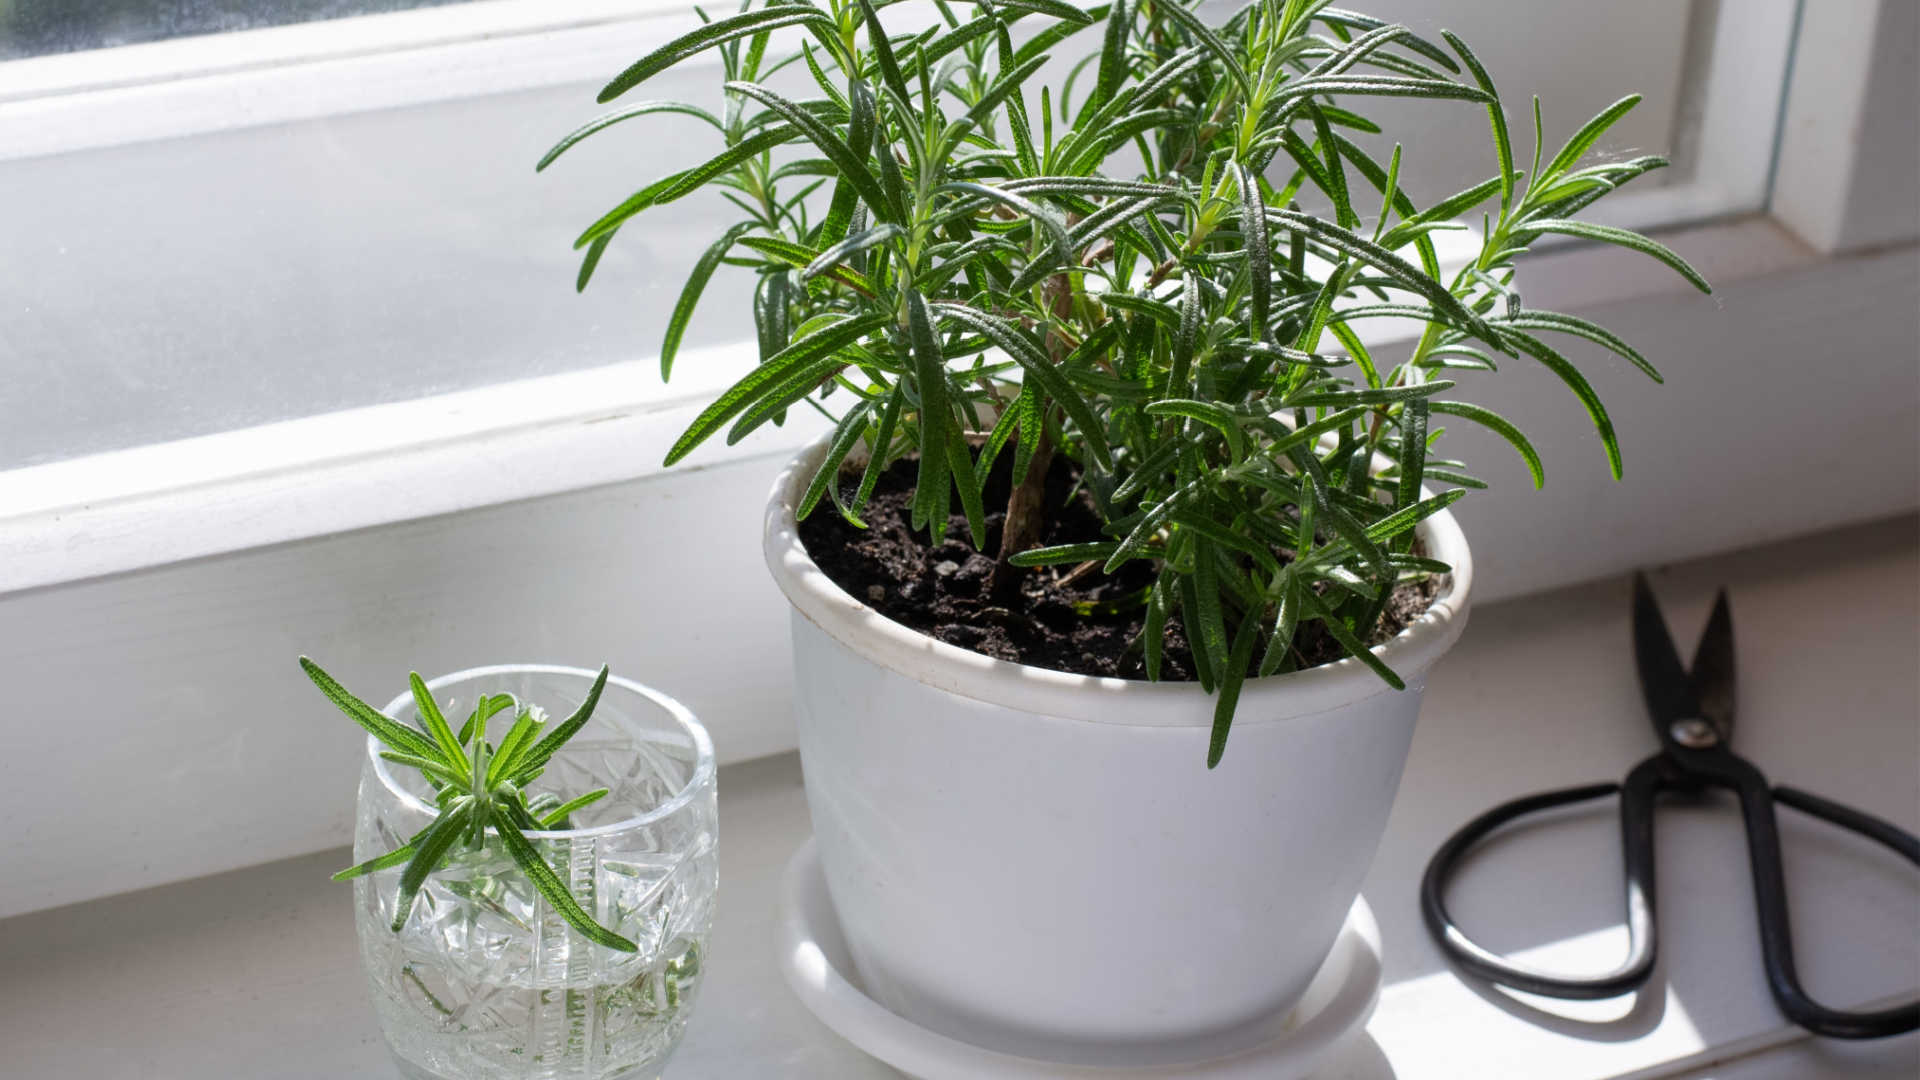
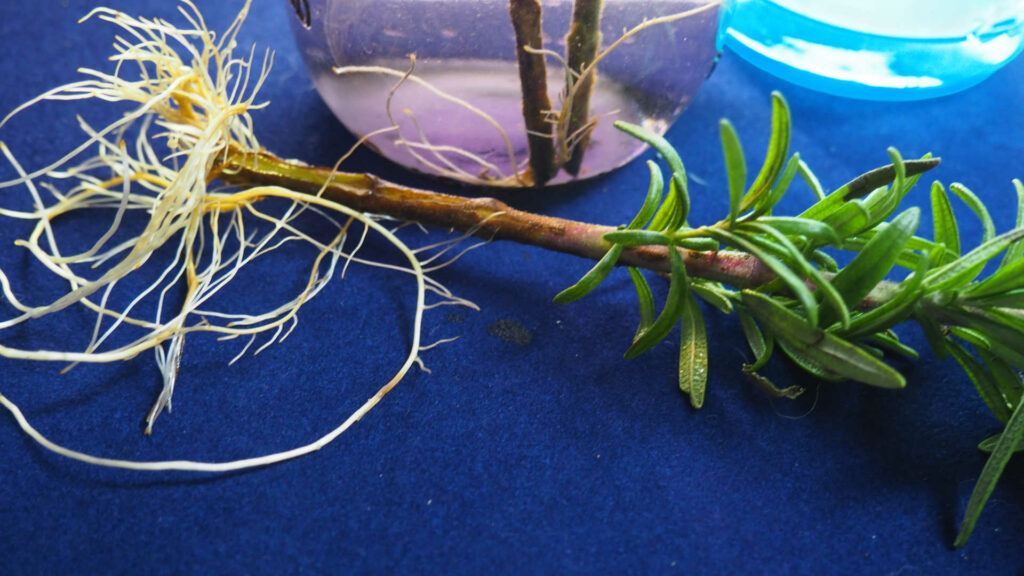
Water Propagation

Start by choosing a container for rooting your plant in. A transparent jar or glass is ideal, as it allows you to monitor the progress of the roots and provide adequate light exposure.
Fill the container with room-temperature water.
Place the prepared cuttings into the jar or glass, making sure the bottom of each cutting is submerged in water. Move the jar or glass to a warm, sunny location.
Make sure to change out the water every couple days, keeping it clean and fresh.
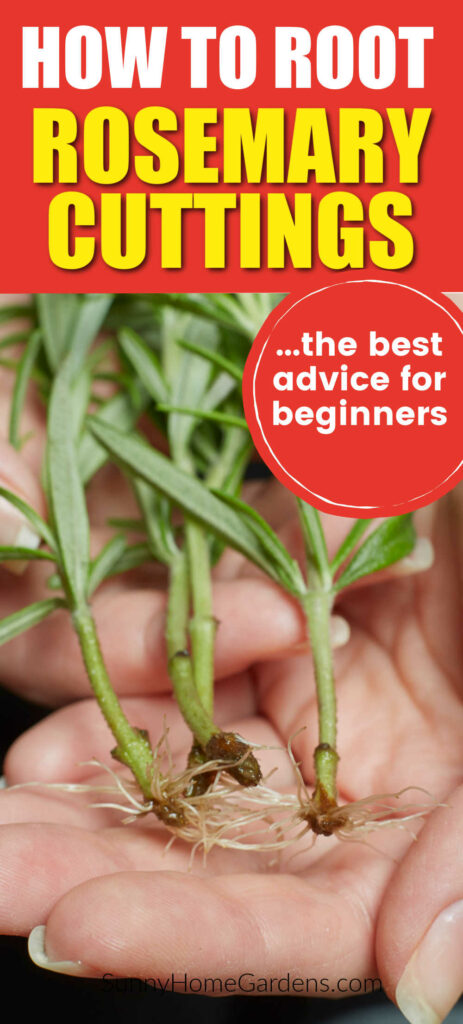
Healthy roots will appear white or off-white and have a slender, thread-like appearance. If the roots become brown or mushy, this may indicate rot, and the cutting should be removed to avoid contaminating the water.
Typically, it can take two to four weeks for roots to begin forming. However, this timeline can vary depending on factors like water quality, temperature, and light exposure.
Once your cuttings have developed a substantial root system in the water, you can transplant them into soil.
Transplanting Outside
Before transplanting outside, you must go through the hardening off process to prepare your rosemary cuttings for the outdoor environment. To acclimate your plants:
- Begin by placing the cuttings in a partially shaded area of your garden for a couple of hours each day.
- Gradually increase their exposure to sunlight over the course of a week or two.
- Monitor the cuttings closely for any signs of stress and adjust their time outside accordingly.
After this process, your rosemary cuttings should be ready for transplanting to your garden. Remember to select appropriate soil, check for proper timing, and follow the harden off process to set your rosemary plants up for success in their new environment.
Layering
Layering is another method to propagate rosemary and involves bending a low-growing stem to the ground and partially burying it to stimulate root growth. Here’s how to do it:
- Select a healthy, flexible stem from the parent plant and remove any leaves from the section that will be buried.
- Gently bend the stem down to the soil surface, and use a pin or U-shaped stake to hold it in place.
- Cover the pinned section with soil, leaving the tip of the stem exposed.
- Keep the soil consistently moist, and roots should start forming at the buried portion of the stem in about 4-6 weeks.
- Once roots have formed, sever the new plant from the parent and transplant it to a new location.
Common Problems and Solutions
One issue you may face when propagating rosemary is disease. To minimize this, make sure your cutting tools are clean and sharp when taking cuttings. Keep an eye on the plant’s health, and if you notice any signs of disease, remove affected stems and leaves, and keep the area around the plant free of debris.
Temperature plays an important role in successfully propagating your rosemary.
The ideal temperature range for rosemary cuttings is between 60-70°F (15-21°C). Try to keep your cuttings in a spot with consistent temperature, avoiding drafts or direct heat sources.
Over-watering is a common problem in rosemary propagation. It’s important to keep the soil of your cuttings moist but not overly drenched. Stick your finger about an inch into the soil, and if it feels dry, it’s time to water. Providing proper drainage will also help prevent root rot.
Just like temperature, sunlight plays a key role in the success of your cuttings. Place your rosemary cuttings in a spot with bright, indirect sunlight for at least six hours a day. Avoid intense direct sunlight, as it can damage the young plant.
You can also use grow lights if natural sunlight isn’t available.
Tips for Propagating Rosemary Cuttings
Before planting your cutting, remove the lower foliage to expose the stem and prevent rot.
Apply a rooting hormone to the cut end to encourage quicker root formation. This step is optional, but it will increase your chances of successful propagation.
Provide your cutting with bright, indirect sunlight and if you want, you can place a plastic bag loosely over the container or jar to up the humidity. Remember to remove the plastic bag occasionally for airflow and to prevent mold growth.
Keep a close eye on your cutting throughout the propagation process.
Monitor the moisture in the potting mix and water as needed to keep it uniformly damp but not waterlogged.
Rosemary is sensitive to cold temperatures, so it’s crucial to protect your propagated cuttings from harsh winter weather.
Make sure to choose younger, non-flowering shoots, as they tend to root more easily.
Sometimes you can get rosemary cuttings to root quicker and easier by sticking them in with another cutting from a plant that is known to root easier. Some of these easier plants include basil and pothos.
t development. Once roots have formed, you can transplant them into a more permanent location.
Best Time for Propagation
The optimal timing for the propagation of rosemary is during spring or early summer or in the early fall.
During these periods, the temperatures are milder, which is conducive to root development without the stress of extreme heat or cold. Additionally, it’s beneficial because the plant is actively growing during these times, allowing the cuttings to establish more readily.
Final Thoughts about Rosemary Propagation
Propagating rosemary successfully can be a rewarding and fun experience. Not to mention a money saver with the “free” plants you can get.
Rosemary plants make great gifts for other gardeners and also are fun to use in plant trades.